
List
The List visualization displays log or trace records as a scrollable list of rows. It renders each record with the same columns the Logs and Traces pages use, so a panel reads like a saved view of those pages. You can add custom fields to surface additional context alongside each row, and colour or rewrite a column's cells with Column Formatting.
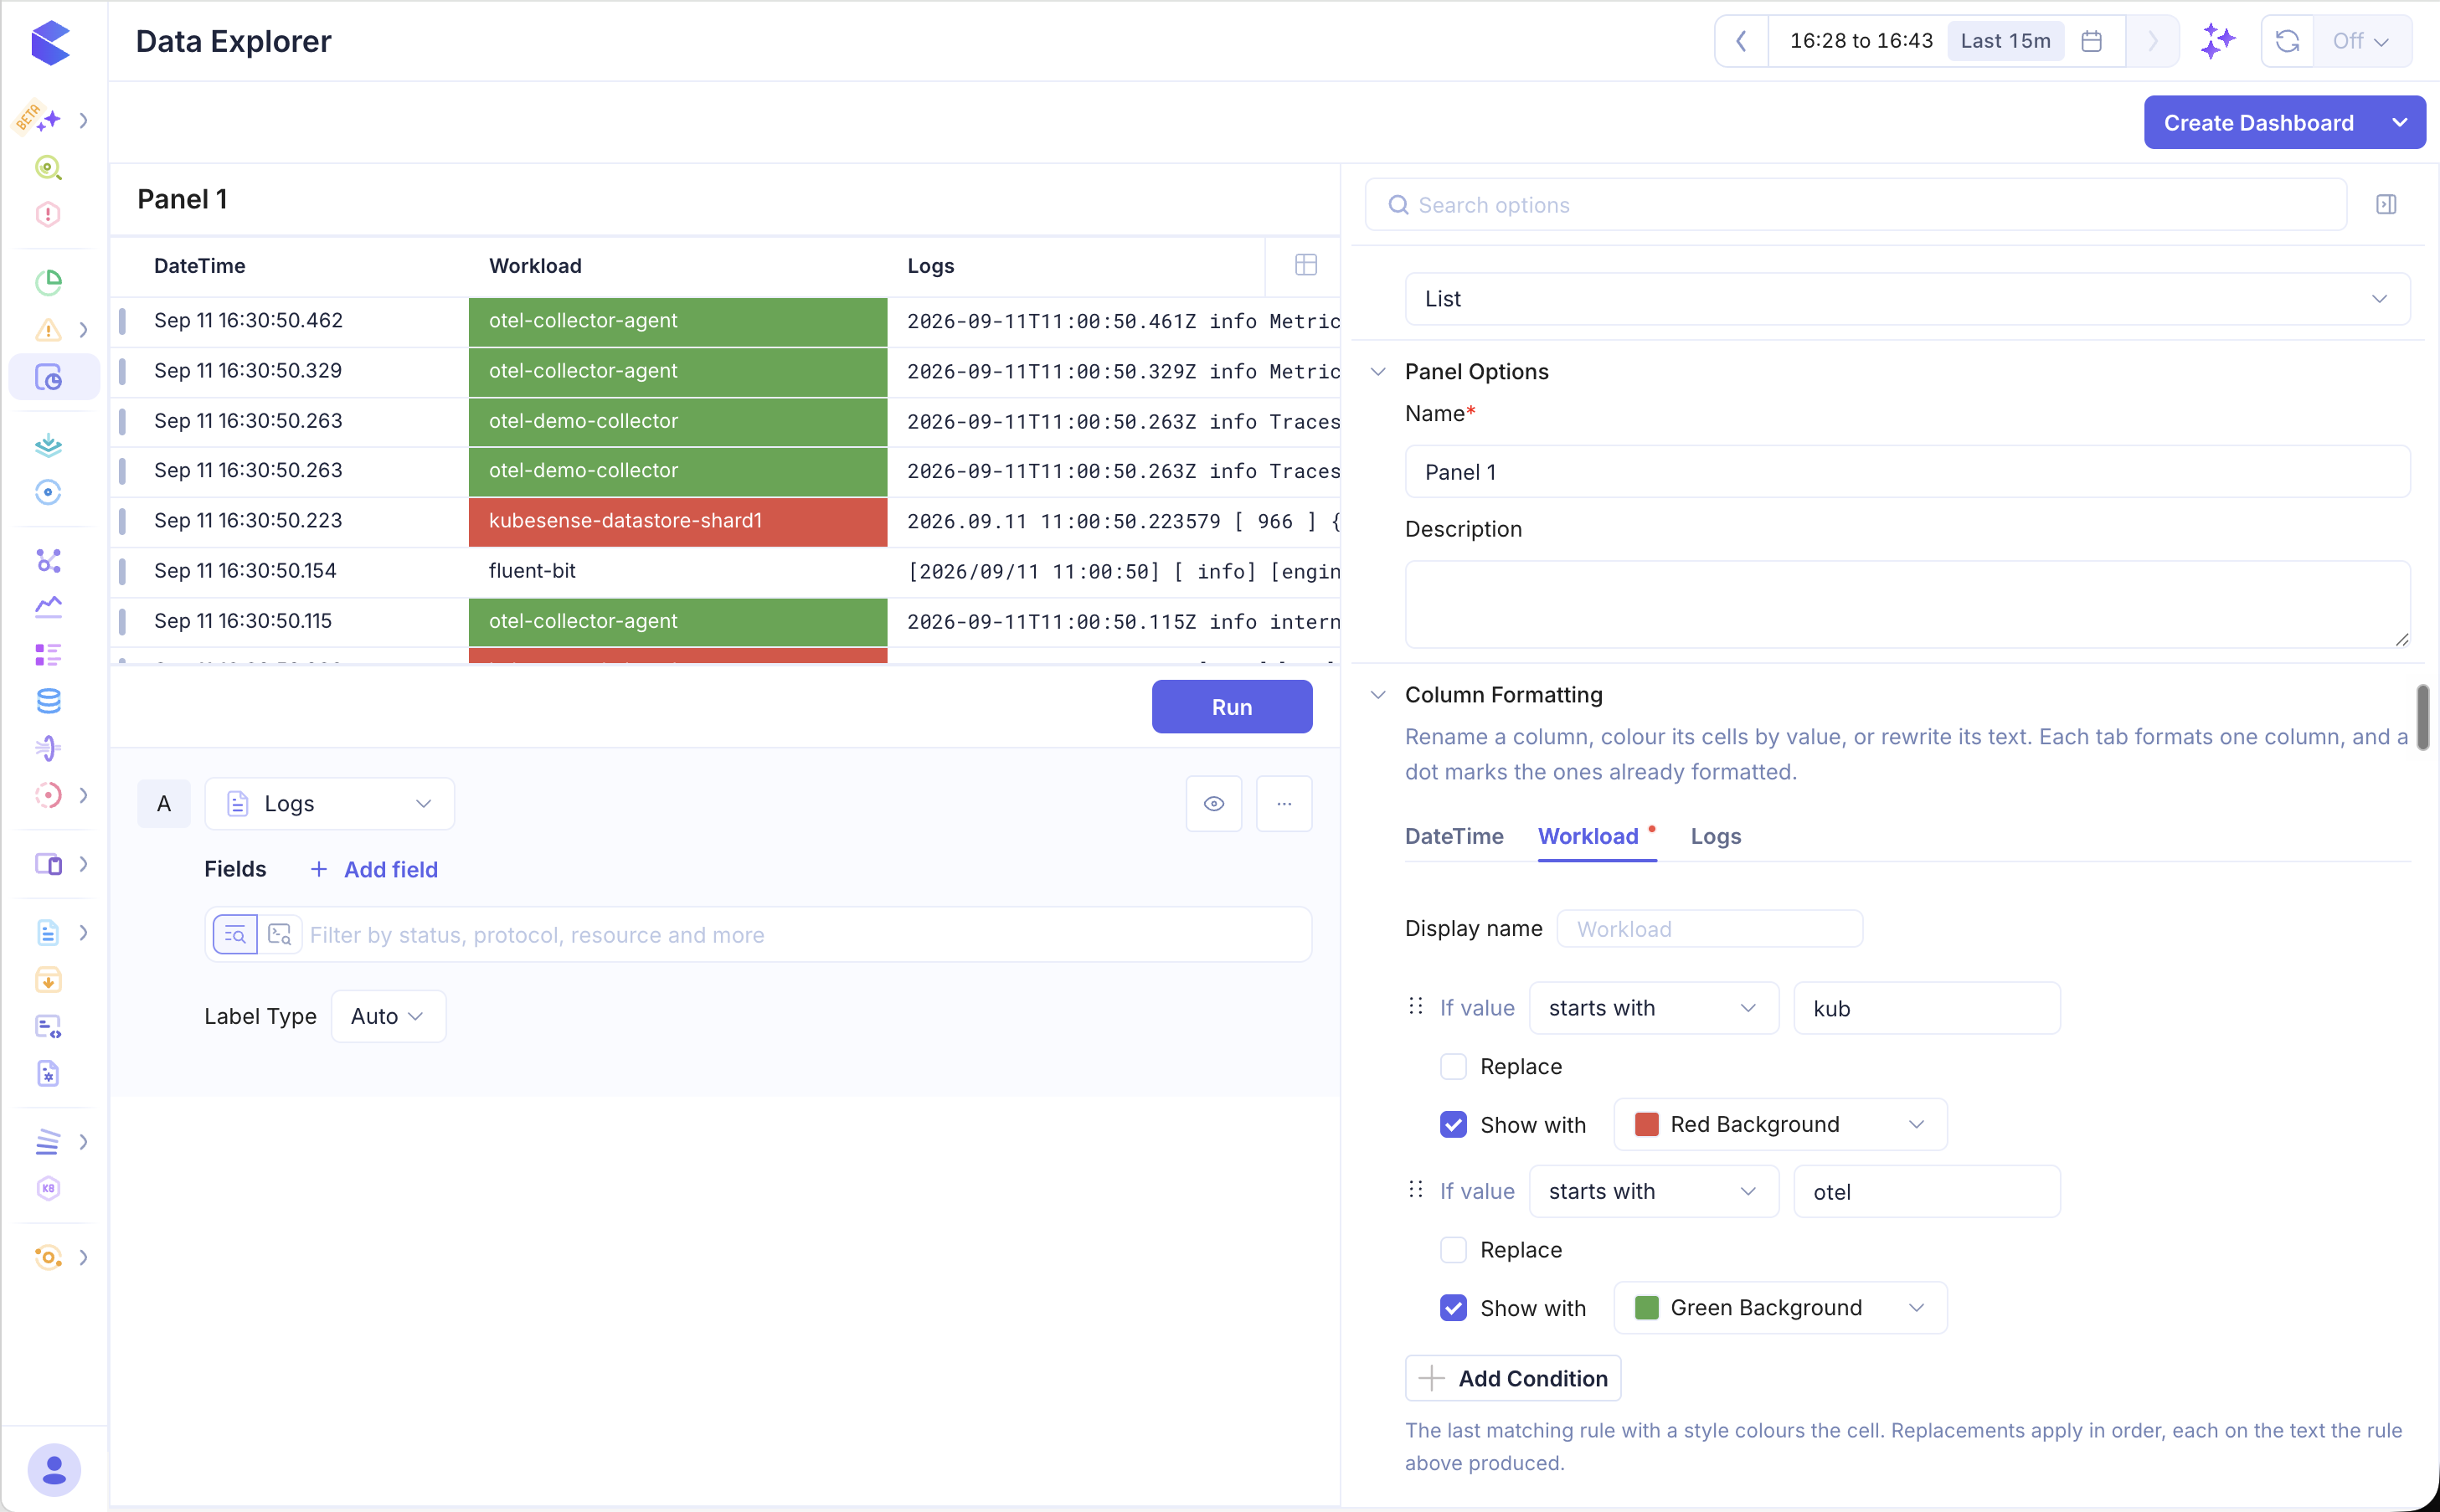
The panel above carries two rules on the Workload column — starts with kub painted red, and starts with otel painted green. A workload matching neither, such as fluent-bit, is left as it is.
When to Use
- Browsing raw log output line by line
- Inspecting individual log entries with surrounding context fields
- Searching and filtering logs without aggregation
Building a List Panel
- Open the Data Explorer
- Select Logs or Traces as the data source
- Configure your query and filters (see Query Builder)
- Select List as the Panel Type in the right sidebar
- Click Run to render the list
Default View
A panel that picks no fields of its own shows the same default columns as the corresponding page.
For Logs, that is the timestamp, the workload, and the log body, preceded by a thin colour bar driven by the log's level.
For Traces, it is the start timestamp, workload, service, resource, protocol, subtype, duration, and return code, preceded by a thin colour bar driven by the trace's status.
As soon as the panel picks any field, the list shows exactly the fields it picked, in the order they appear in the Fields row. The colour bar is always kept.
Custom Fields
Add extra columns to the list by selecting attributes in the Fields row below the query builder. Click + Add field and pick an attribute, or type @ to search available log attributes. Each added field becomes a column in the list.
Adding workload alongside the timestamp, for instance, makes it easy to identify which service produced each entry.
Each field tag has its own controls:
| Control | Action |
|---|---|
| Drag handle (⋮⋮) | Drag the handle on the left of a field to reorder it. The column order in the list updates to match the order of the field tags. |
| Edit (pencil) | Rename the field or set a display alias for its column header. |
| Remove (×) | Delete the field from the list. |
Reordering Fields
Fields render as columns in the order they appear in the Fields row, from left to right, whether a field is a built-in column such as workload or an attribute such as @ctx. To change the column order, grab a field's drag handle (⋮⋮) and drop it into a new position — the list re-renders with the columns in the new order. This lets you arrange the most relevant attributes first without removing and re-adding fields.
Filtering
Use the filter row beneath the Fields input to narrow results by status, protocol, resource, or any other log attribute — the same filtering controls available in other panel types. See Query Builder — Logs and Traces Queries for details.
Column Formatting
Column Formatting controls how each column is named and how its cells are rendered and coloured. Open it from Column Formatting in the panel editor, then pick a column from the tab strip — every column the list currently renders has a tab, and a dot marks the ones that already carry formatting.
A column carries no formatting until you change something for it, so a panel you never touch renders with its default names and plain cells.
Which controls a tab offers depends on the column's type, which the API reports for every column it returns. Numeric columns offer the cell types and value colouring described for table panels. Text columns offer the text rules below. Timestamp columns offer the display name only.
Display name
Override the column header. Leave it empty to fall back to the column's derived name, which comes from the field's alias or its label. Clearing the field restores the derived name rather than blanking the header.
Text rules
A text column can be recoloured and rewritten by a list of rules. Click Add Condition and set the match:
- Operator — one of
is,is not,contains,does not contain,starts with,ends with,is empty,is not empty - Value — the text to compare against, matched case-sensitively
A rule matches nothing until you give it a value, so adding one does not paint the column before you have said what it matches. The two emptiness operators are the exception: they ask about the cell being blank rather than about any text, so they take no value and their input is hidden.
Then enable either effect, or both. A rule with neither enabled is valid and does nothing.
Replace rewrites the cell's text:
- Cell replaces the whole value with the text you supply. It does nothing until you supply one, so ticking Replace does not blank the column.
- Substring replaces every occurrence of a search text with a replacement. Leaving the search empty replaces nothing; leaving the replacement empty deletes the match, which is how a prefix is stripped.
Show with paints the cell, using the same styles as a numeric threshold: a background or text colour in red, yellow or green, their lighter variants, or a custom colour.
The two effects resolve differently, and the difference matters when several rules match one cell.
The colour is taken from the last matching rule that sets one, because a cell has a single colour and one rule has to win. The replacements all apply, in list order, each acting on the output of the rule before it. So a rule that strips a k8s. prefix and a rule that rewrites error both take effect on the same cell rather than one cancelling the other. Every rule is matched against the cell's original text, so a rule's own output can never stop a later rule from matching.
Rules apply only where the underlying value is text. A cell holding a number is left alone.
Panel Configuration
Panel Options
| Option | Description |
|---|---|
| Name | Display name shown in the panel header |
| Description | Optional description for additional context |
Other Sections
| Section | Description |
|---|---|
| Column Formatting | Per-column display name and text rules |